Each instalment of Mysteries of Cobble Hill Farm features a special English recipe connected to the story.
In Book 3–Into Thin Air-–
it’s early August and bilberry season. Harriet enjoys Mucky Mouth Pie courtesy of Doreen Danby, her wonderful neighbour who also happens to be a baker extraordinaire.
Mucky Mouth Pie*
Ingredients:
3 ½ cups bilberries** (In North America can substitute blueberries or Huckleberries)
¾ cup white sugar
scant 2 cups pastry flour
½ cup butter
8-9 teaspoons of cold water
Directions:
- Cut the butter into the flour until crumbly, sprinkle with water to form into a ball. Let rest in a cool place for 30 mins.
- Divide pastry in half, then roll out half to line a 9” pie plate.
- Fill with berries and mix in the sugar. Add a splash of lemon juice if desired.
- Roll out pastry top and cover pie. Dampen and seal the edges, trimming excess.
- Jab the top with a fork in the center to allow steam to escape.
- Bake in preheated 375 F oven until pastry is brown and crisp.
Hint: Best served hot, with custard, or cold with whipped cream.
Popular Variation: Bake bilberries in a Yorkshire pudding batter.
* Mucky Mouth Pie is so named because of the color it tends to leave your mouth. 😉
**bilberries are also called moorland berries, wimberries or European blueberries. They are a close cousin to North American blueberries, but smaller and more acidic.
In Book 9–Wolves in Sheep’s Clothing–
it’s February when Yorkshire celebrates Yorkshire Pudding Day. Doreen Danby teaches Harriet the finer points of making the beloved side dish to Sunday’s roast.
Yorkshire Pudding
Ingredients:
4 large eggs
1 cup milk
1 pinch salt
1 cup all-purpose flour
2 tablespoons beef drippings, lard or vegetable oil (not oils with a low smoke point)
Directions:
- Thoroughly whisk eggs, milk, and pinch of salt in a bowl and let stand for ten minutes.
- Sift a cup of flour into the egg and milk mixture and whisk well so there are no lumps. Let sit for at least thirty minutes to allow time to rise and chill.
- Preheat oven to 425°F. Do not use convection.
- Spoon a ½ teaspoon of fat into each hole in a 12-hole muffin tin. Ideally use a tin that’s only been wiped clean between batches, not washed with soap and water, which can cause the puddings to stick and not rise properly. Heat until smoking—about 5 minutes.
- Quickly fill the muffin tins 1/3 to ½ full and return to the oven as quickly as possible.
- Bake for 20 to 25 minutes until puffed up and golden brown. Resist the temptation to open the door before they are finished baking, or the pudding will likely sink.
- Serve immediately. Can be stored in the refrigerator in an air-tight container for 3 days and reheated at 350°F for 10 mins.
Tips: Ensure batter is cold and lump free and oven is hot before cooking; do not open the oven door during cooking; keep baked puddings away from drafts.
In Book 18–The Elephant in the Room–
it’s November and Polly is eager to help Harriet impress an old uni mate of Will’s with a scrumptious spread. Doreen chips in by creating a twist on the traditional Battenberg cake by using the beloved taste of Terry’s Chocolate Orange, which was invented in Yorkshire.
Chocolate-Orange Battenberg Cake
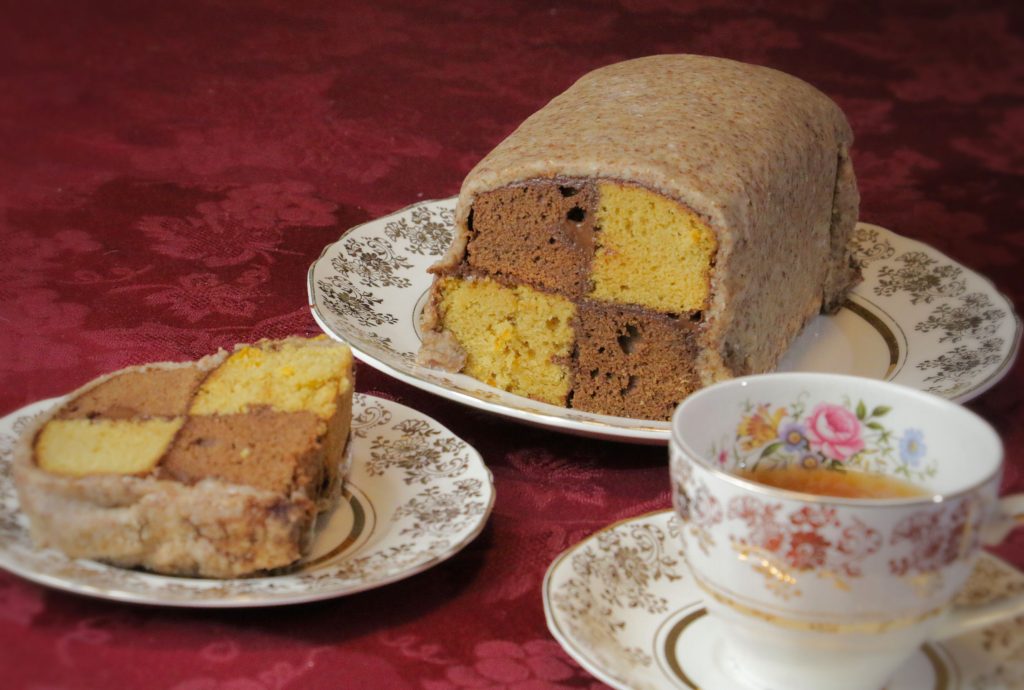
Battenberg cake is traditionally made with pink and yellow almond sponge cake, sliced and arranged in a checkerboard pattern “glued” together with apricot jam. Then the entire cake is encased in marzipan. But taking my inspiration from Yorkshire’s famous Terry’s Chocolate-Orange, I opted to add a chocolate-orange flavor twist.
Ingredients:
Be sure to read the important tips at the end!
For pre-flavored cake** batter:
175 g softened butter
3 eggs
175 g brown sugar (demerara style is especially nice)
170 g+ all-purpose flour mixed with 2¼ tsp baking powder & a pinch of salt (OR 175 g self-rising flour + ¼ tsp baking powder)
For the chocolate cake batter:
2 tablespoons cocoa powder (Dutch-processed recommended for its more intense chocolate flavor and darker color vs. natural cocoa)
½ teaspoon vanilla extract
For the orange batter:
2 drops Food-grade Orange essential oil, or equivalent flavor extract
the zest of one orange finely chopped
Chocolate Filling:
Scant ½ cup whipping cream (or higher fat content cream)
¼ cup 50% dark-chocolate chocolate chips or grated chocolate
Marzipan:
1 ½ cups almond meal (for a natural-colored topping; or use blanched almond flour for white)
1 ½ cups powdered sugar
1 egg white
Directions:
- Prepare an 8”x8” cake pan by folding a sheet of foil in half to make a divider halfway across the pan, then separate the foil at the base to line the rest of the pan. Then line each side with parchment paper to ensure batter doesn’t leak through.
- Preheat oven to 350 F.
- To make the cake batter, beat the butter until light and fluffy. Add brown sugar and beat. Add eggs one at a time, beating well after each addition. Scrape down sides of bowl periodically. Add the flour mixture and beat until thoroughly mixed.
- Divide the batter into two equal halves. In one half, add cocoa powder and vanilla extract and mix thoroughly. In second half, add orange flavoring and zest and mix thoroughly.
- Carefully spoon the orange batter into one side of the prepared pan and smooth evenly into the corners. Fill the other side of the pan with the chocolate batter.
- Bake in preheated oven for 30-35+ mins. A toothpick inserted in the center should come out clean.
- Cool cakes for 10 minutes, before turning onto a wire rack.
- While the cakes are cooling, prepare the chocolate filling and marzipan. Prepare the chocolate filling by heating the cream in a small pan on medium-low until it starts to boil. Remove from heat and stir in chocolate until it melts, and mixture is smooth. Pour the mixture in a shallow glass dish. Once mixture cools, chill in the fridge until spreadable.
- For the marzipan, mix the almond meal and icing sugar in a food processor, pulse in egg white until the mixture forms into a thick dough.
- Transfer the marzipan to your work surface and knead. If the dough is too sticky, add more almond flour. If the dough is too firm, add a smidgen of water. Marzipan will become firmer once refrigerated. After kneading a few times, roll dough into a log then wrap in plastic and refrigerate.*
- Before assembling the Battenberg cake, ensure it is completely cooled. Using a long cake or bread knife, level off the top of the cake and slice through the center of each. If necessary, trim sides so each rectangle is the same size. You should have 4 long rectangles. (N.B. I chose not to square off my top rectangles, giving the top of my pictured cake a rounded appearance.)
- On a large sheet of parchment dusted with icing sugar, roll marzipan into an 8”x12-14” (20 cm x30-35 cm) rectangle. Place a clean sheet of parchment paper on top then using a cookie sheet for extra support, carefully turn over the rolled-out marzipan and peel off the original parchment paper. Trim edges then spread the chocolate filling thinly over the marzipan.
- Arrange one long cake rectangle of each flavour in the center of the marzipan joining with a thin layer of chocolate filling.
- Spread chocolate filling over the pair of cake rectangles. Arrange the last two rectangles on the opposite color in a checkerboard design, using a thin layer of the chocolate filling to hold them together.
- Carefully fold the marzipan around the assembled cake. Turn over so the seam is on the underside. Trim ends as needed.
Important Tips:
*Marzipan can be made in advance. It will keep for weeks in the fridge.
**Dividing the cake pan with foil can be fiddly. Save yourself the hassle by doubling the recipe and making one full cake pan of each flavor. Then once cool, cut each cake into 4 long rectangles and build two Battenberg cakes. Or get creative, cut them into 5 rectangles and make a 3 layer by 3 column checkerboard cake.
+Measuring your cake ingredients by weight ensures the best result. Please be aware that equivalent measurements by volume can vary widely depending on flour density and the way it’s measured. For example, while developing this recipe, I found that 1 cup of my all purpose flour weighed 150g whereas, the estimate I found online for 1 cup of flour was 120g, while another site said 1 cup weighed 170g, which is why I opted not to provide an equivalent volume.


Great to "see" you here today! I look forward to reading your comment.